wovencrop2
wovencrop1
wovencrop3
wovencrop4 wovencrop5 wovencrop6 wovencrop7 wovencrop8

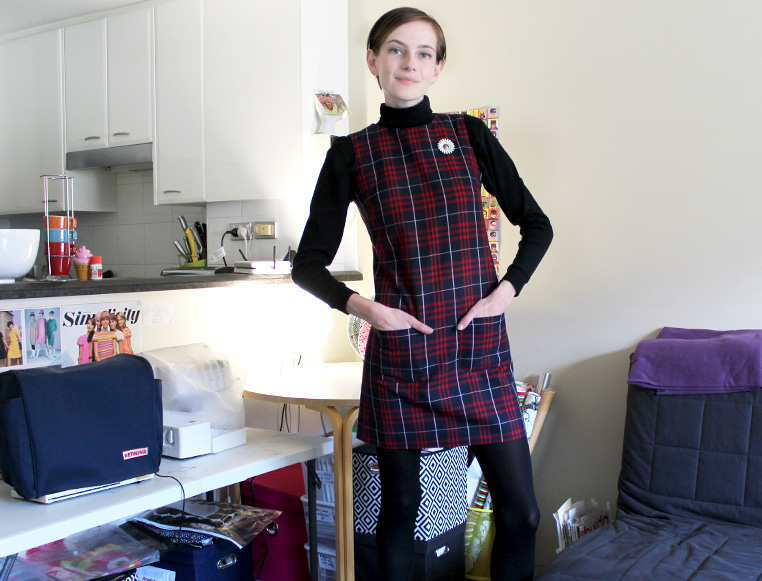
With so many things on my endless sewing queue I had to ask myself- what do I want to make the most? what will I get the most wear/enjoyment out of. Wouldn’t have guessed that would be a crop top, but for some reason making a woven crop top has been on my wishlist for a long time!   Note: I didn’t make the skirt in the above pictures, I only made the top. I know the skirt is fabulous! (I do want to make my own similar version because it is very easy to wear)

I have been seeing lots of these fabulous two piece sets and I’m still not sick of the crop top trend (not that I’m one to follow trends, but when it’s right for me I just go with it).

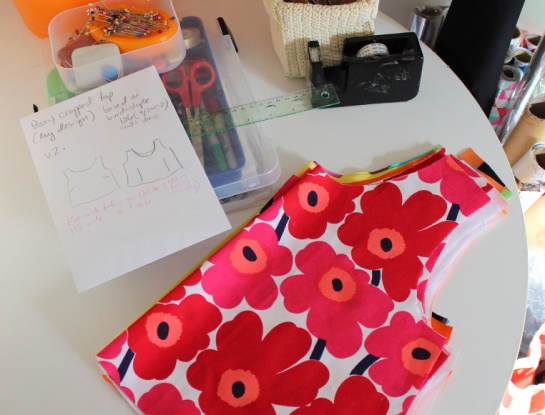
Anyway I had a muslin/toile lying around from a past project (my Marimekko shift dress), so I thought, (to make things easier) why not adapt this pattern by marking and cutting up this toile that I already have?! Then it was quick and easy to check the length and create a new neckline (by cutting directly into the toile). I marked the muslin/toile with the design changes I wanted, retraced the paper pattern that (that the toile was made from) and then made my design changes to my traced pattern: transforming the shift dress pattern into a cropped top (of my own design).

Was all the pattern making tedium going to be worth it? I wasn’t sure if it was going to work because I don’t really know what I’m doing when it comes to pattern-making (I am NOT a maths person- maths is what I’m worst at, so I’m kind of scared of drafting) but there was no horrid maths and It was all pretty intuitive.

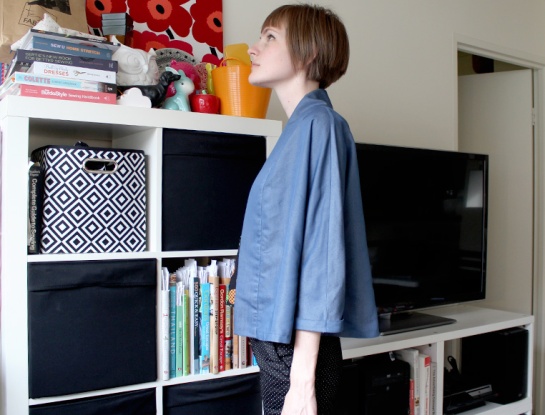
I gotta say I was surprised- the system worked! 😉 It was just the kind of top I saw in my head. YAY!!

The finished product feels a bit more sophisticated than cropped knit top and because I made it reversible the extra layer adds structure to the piece. I also love it because I have and I have a lot of high-waisted skirts so it fits surprisingly well into my wardrobe (I am wearing the top as I type this). If I travel again, I just may take it with me because you get two different tops that take up the space of only one.

wovencrop

wovencrop-p6
By the way I have used this black and white spot (cotton/poly poplin) fabric before. I made a dress from it in 2012!

wovencrop-p7
The black fabric on the reverse side is a black cotton voile (light and lovely to work with) I bought in bulk when on sale of course 😉

I almost forgot to mention that I designed the neckline so that it would be low enough for the top to slip over my head (no fastenings or zippers needed)

I thought of drafting a facing for this top. Facings do make for quicker sewing but I figured since the top was so small I would go all out and just line it (more time consuming but a better finish). Did I want to make my life easier and add a center back seam? Heck no! Was kind of a blessing in disguise because I had to put my problem solving hat on when lining it and now I remember the trick I was taught, which is impossible to put into words. If i was to explain I think id need to do a video…not because it’s smart or hard, but simply because its so dam tricky to explain.

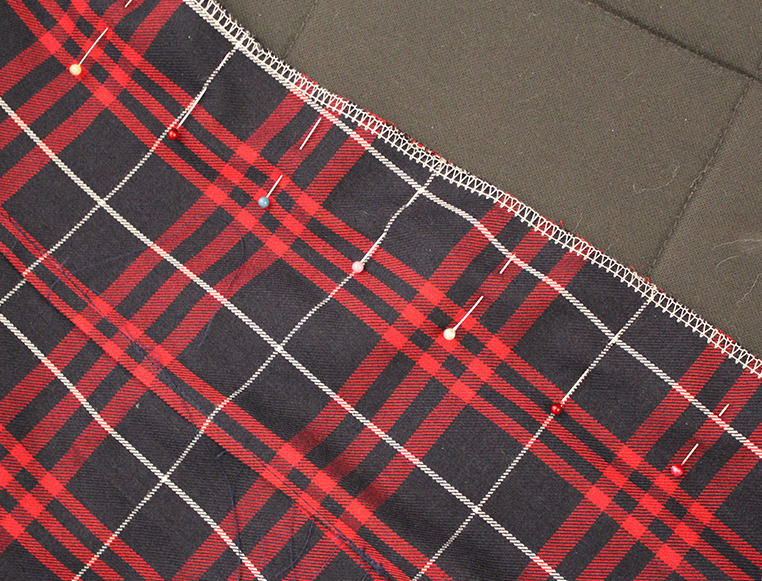
I got some good pictures of my (sewing) process so i’ll show instead of tell…

wovencrop-p1 wovencrop-p2 wovencrop-p3 wovencrop-p4 wovencrop-p5

I was on such a high after making this! Don’t be surprised if I make, like, a billion iterations in different prints and colours. I have already cut out the 3 (linings included) 😉

wovencrop-p8

tokyo02
tokyo05

tokyo04

tokyo06

tokyo08

Hey friends! I have been away too long and boy do I have a lot of blogs to catch up on. Thanks to all the lovely people who left nice comments about my crazy loud marimekko unikko dress :).

I’m always delighted by how supportive the sewing community is! Thanks ladies xo

So the Tessuti Tokyo jacket pattern…How could I resist this pattern when it’s named after a city I desperately want to visit?! Plus I love the idea of a relaxed spring cover up.

This was my first time using a Tessuti pattern and it will NOT be my last! Those of you who have followed me for some time know that I am NOT an instructions gal! I like to wing it and experiment when it comes to sewing, but for the first time I found myself following the pattern instructions and actually enjoying it! The instruction booklet is gold! Real life photographs and clear instructions (rather than the confusing diagrams and vague explanations that often feature in the big 4). The only time I was slightly unsure was when I did the cuffs. Not certain I did as instructed, but I’m happy enough.

The fabric I used has been in my stash for so long that I only have a faint memory of buying it. I’m pretty sure it came from a spotlight sale table. It drapes well and feels lovely to wear and I’d hazard a guess that it’s rayon and/or cotton.

tokyo01  tokyo03

I don’t think I did this pattern justice due to my boring fabric choice, but I wanted to test out the pattern and  I didn’t feel like going with chiffon or satin, though I should try working with them more often cause I need to practice working with trickier fabrics!

I omitted the pockets and shortened the hem of the jacket. I’m fairly certain it was by about 8 cms, but I’m not in the mood to dig out my pattern and find my notes.There is some faint puckering near the front and I’m not sure why (thought my machine tension seemed fine).

I promise you if I make this again I’ll do it in fabric that is much more exciting.

I have already cut out my next Tessuti pattern and I also vow my fabric choice is much more inspired! I often post images on my instagram related to my latest sewing projects.
The next one should be super fun!

UnikkoShift-m01
UnikkoShift-m05
UnikkoShift-m04
UnikkoShift-m03

This is a project I finished some time ago. One thing you must know about me is The Marimekko Unikko print is my favorite print of all time! When my mum gave me this textile I was overjoyed- however my plan to go ahead and use my favorite fabric (rather than leaving it hiding in the stash forever) almost backfired with this project- more on that later!

A bit of history regarding the print: the Unikko/poppy print: it was designed in 1964 by Maija isola, as part of a collection of floral prints, after Armi Ratia (the company’s founder) had announced that Marimekko would never print a floral pattern. Thank god for Maija’s little act of creative rebellion!
The colour-way I have here is pretty rare (orange, pink and lime green -wow. I just LOVE it!). Though it’s impossible for me to put into words why/how much I love this print- I think it captures a lot of what I like so much about the 60s. It’s bold youthful and optimistic and there is this delightful naivety to how the poppies are rendered *sigh* so beautiful.

Why the sewing pattern? I didn’t have a lot of fabric to work with and you probably know how much I love shift dresses! The sewing pattern was the same pattern I used for my ‘School days’ pinafore shift dress (an old burda style magazine 9/2008 style 106 size 10/36). The dress is a loose boxy style that has the big advantage of a skirt portion that is only slightly flared- meaning I had just enough fabric for the dress. I don’t know how flattering this style is on me and I think that is where I ran into trouble…

After I had sewn the shoulder seams together and added the facings I felt very very excited about the dress BUT…

I felt that the last time I used this pattern it was a smidgen too tight and I wanted a relaxed fit (so I sewed with 1cm rather than 1.5cm seam allowance)- Anyway because the dress was so boxy I felt as though I had to shorten the dress A LOT to make it work.

I must have been in a crazy state of mind because I cut WAY to much off the hem, putting it into tunic territory. Lets just say I was pretty distraught! I had just cut a dress made in my most favorite fabric too short!

If you have ever been in a car crash you may know that feeling you get when something bad/shocking happens- it’s almost as if you detach emotionally and watch it all unfold in shock and disbelief, as if its happening to someone else. Sorry to be melodramatic but that’s sort of how I felt when I cut the dress too short!

Luckily the part I cut off was still intact and connected at the side seams. I took time deciding what to do. Got some great suggestions from my friends on instagram and ultimately I decided I would re-attach the part I cut off and add some piping in between, in order to make the seam look intentional. Lincraft had a surprisingly good selection of piping. I bought 2 meters in a couple of different colours and ultimately went with this pink velvet piping.

Clearly there is a lot of fun to be had with Piping! It was my first time using it and it certainly wont be the last. OK I KNOW the middle flower doesn’t match up at the petal on one side, but I’m still going to file this project under ‘crisis averted’!

You will notice I used a different fabric for the facings. This is the way to go when you only just have enough fabric for what you want to make. Plus this fabric is very precious. I am turning any remaining off-cuts into pouches and/or pencil cases!
UnikkoShift-04UnikkoShift-05
UnikkoShift-02
I quite like my bright yellow invisible zip. I’m not the kind that thinks invisible zippers always need to match your project exactly. Perhaps I am a bit of a rebel too 😉 Happy 50th Unikko!
UnikkoShift-07 UnikkoShift-06

td3
td1ed
td4

I finally made something cold weather-friendly! I started a new job recently ( 🙂 Yay! So excited! It’s wonderful!) so I really wanted something handmade to wear that is for winter (because winter never seems to end) and works well with layers.

I was really excited about the idea of this dress but I’m not sure I have really pulled it off. I wanted the shift dress to be super simple so that I could wear turtle necks and long sleeve tops under it.

Not sure I like the pocket placement or the length (I intentionally made it slightly longer so as to be more suitable for work). I took a lot of care when cutting out the front and back pieces of the dress but not much when cutting out the pockets. Big mistake!

The fabric was wonderful to work with. Not certain of the fiber content but it presses really well.

The tartan certainly takes me back to my high school days (in Australia a lot of school uniforms are made of similar fabrics to this)…

Thinking back those final 2 years of high school were some of my happiest. Maths stopped being compulsory and I started doing really well academically because I was enthusiastic and interested in work/school subjects.

If only I kept this up after my design course! I really started to lose confidence in myself after completing my design course…
I remember the fun I had with friends back in high school. I was an outsider back then but at that point I really embraced who I was- being different and not hiding it. As you can imagine I was never one of the ‘cool’ people. In my small group of friends we were all very different from one another but we had fun and laughed a lot. I didn’t keep in contact with any of them and I really regret this!

I started dating my (still current boyfriend) back then and we are still so happy together! I remember going to so many concerts (ska bands and what not ha ha ha) with him back then, in my doc martens and customized clothing.

Things may have changed a lot but luckily the bad memories seem to have faded into the background. I do think things are much better now! I just have to make an effort to be positive (especially about myself) I want to keep creating good memories! I don’t want to look back on this time in life and think I wasted it beating myself up about things and worrying!

Sorry that was pretty heavy! I just remembered this is a sewing blog so lets talk about the dress…

Sewing nitty gritty:

td10
I discovered some nifty things whilst making this dress. My favorite discovery was using my blind hem foot when attaching patch pockets. You just need to experiment with the positioning of the needle and then it’s magic! The plate on the foot acts as a great guide when stitching around the pocket. Yay!

td16

Another thing I did with this dress was to lengthen my stitch and do basting intermittently on parts where the tartan had to match at the zip BEFORE stitching the other side of the invisible zip on completely (a tough one to explain) I felt this really helped because sometimes lots of pins are just not enough!

Reasonably good stripe matching at the invisible zipper (below)…

td11

I also basted the pockets on before stitching them properly and unpicked the basting later (changing my stitch length to the longest avaible stitch length for ease of unpicking). I prefer this to pinning the patch pockets on because pins can get in the way!

td17

Want to see how i created my patch pockets? Secret lining!

td13

The pattern I used for this dress was from an old burda style magazine (9/2008 style 106 size 10/36). I did make a muslin of this pattern before hand. I got excited because I thought perhaps I had found the ultimate shift dress pattern. I realize now that finding the ultimate shift dress is much like finding the ultimate pair of jeans…a quest without an end! haha

I have another dress lined up using this sewing pattern- should be fun to see how this pattern will work for a shorter dress in marimekko fabric :). When I work with this pattern again I am going to let out the side seams.

Obviously this style is not intended to be fitted at the waist, but I do feel like there is not enough ease at my hips (kind of rare for me).! If you have never worked with burda patterns before, but want to try please bear in mind they have a LOT less wearing ease! It may just be due to my change in size recently but I really think burda patterns are more fitted and true to size than the big 4.

The patch pocket was taken from another pattern (McCalls 6322). I’m working on a dress using this pattern too, but why not mix and match pockets if you have found one that works of you?!

Other things worth mentioning…

Using lots of pins when working with stripes 😉

td14

All-in-one neckline facing (before I graded and turned it)…

td15

My (almost) matching ‘unmatched’ pockets :S :p argh!

td9
So close! -at least the stitching around the pockets is good.

The last images are an ode to how much I love my blind hem foot. Stitches on the skirt hem are totally hidden! 🙂

td7
td6
td12

yellowbowdress04ed
yellowbowdress05ed
yellowbowdress06
yellowbowdress03ed

My lack of activity in the blog-o-sphere really has been haunting me, I wont lie!

I recently started a new job. Don’t think it’s right to discuss work on a blog but I will say that I am really excited and I hope I can do a good job :)!
Yesterday I got in lots of sewing time in (housework be dammed) and today I made the final touches to this dress.
All my recent sewing projects seem to leave me with mixed feelings. I don’t know if that’s because my sewing is getting better (so I have higher standards) or because I pick the wrong things to make. Anyway here’s the new 60s dress (yes it’s another shift dress 😉 )

I didn’t get great pictures of me in the dress. I didn’t feel so fab, I had minimal make up on and then other things that I had to do came up. I guess I could always post better pictures later… (ugh ‘later’ seems to be my motto these days!)

yellowbowdress01
yellowbowdressed
yellowbowdress02ed

Sewing nitty gritty: 

I am not really stoked about the fit of this dress. I think I could have gone up a size or made the side seam allowances smaller.

For anyone else who is considering making a dress up in the same pattern I would probably recommend going up a size if you don’t want a super tight fit. I have heard that vintage patterns are generally a smaller fit and this one has lots of darts and shaping.

Recently I have gone up half a dress size, I’m happy about it, but it does make deciding what size to cut more complicated (I’m sure others can relate). A lot of people move between sizes at different stages, but you want to pick a size that will work over time, so yea perhaps it’s better I go for a slightly looser fit next time!

The tricky thing about this faux cotton eyelet fabric is the ‘crease factor’. I am not really against a bit of creasing and I went to the trouble of underling the dress with a lightweight cotton which preserves modesty and makes the dress way more fancy! I really do love the effect underling has on a dress! It makes the dress fabric behave and it makes the dress feel much more substantial.

I really recommend underling. If you want to try it, or just want to learn more Julia Bobbin has a great tutorial/info !

I do wonder if the yellow cotton material was the right choice for this style of dress!  Despite the underling, it does pull and crease slightly (which is to be expected) but perhaps the fabric would have served me better as a top or a fuller pleated skirt. Doing something so fitted in a lightweight cotton may have been a bit silly.

The bow was fun and not difficult to make. I feel like adding bows to all my projects now. Mmmm I’m a big fan of the bow 🙂 (though I don’t enjoy the hand sewing on it).

I had those eyelet stripes going across the dress, which meant that I wanted them to match the fabric on both sides of the zip. I found a neat way of basting the other (yet-to-be-attached) side of the zip (keeping the regular sewing foot on and just moving the needle), before sewing the other side of the zip on….Guess that it’s too hard to explain without a tutorial.

That’s probably enough about the dress. Hope you like it!

I made a muslin using a different burda shift dress and it’s got me pretty excited excited about! It’s a looser fit shift dress, totally basic design and it’s bra-friendly. so I’m sure I will make a lot of dresses soon in crazy bold patterns!

-Kath

feltpop02ed
feltpop03
feltpop01

I have been ‘out-of-action’ sewing-wise recently (several cut out projects remain stitch-less so far), which explains my blog negelect but what really upsets me is all these amazing looking blog posts I haven’t read yet! I have a lot of sewing blogs to catch up on and I can’t wait for the inspiration hit.

This weekend involved shopping, Korean BBQ and hanging out with my boyfriend/all-time favorite person, so even without being at the machine I was happy. Recently I have also become more interested in cooking and baking. I’m starting to change my diet and eat tons of healthy food… My cheeks are filling out, my skins clearing up and I feel much better! 😀

Last week I drove to Chatswood. This was a huge deal for me because driving in the city terrifies me (I usually walk or take public transport). The reward for making it to Chatswood alive was a trip to Daiso and a lovely late lunch at Mamak. Daiso was epic this time! They had a huge selection of polyester felt. Happily I bought some felt squares in different colours as I knew exactly what I wanted to do them…

My plans for said felt was a jumper featuring one of my favorite things: A chilli! How fun would it be to have a jumper with one of my favorite foods?!

But before I attempted a more detailed design I wanted to test out how this felt would work/look sewn to a jumper, so this ice cream/Popsicle design was my test run. I’m wearing it right now! I love how bright and cheerful and non-winter it is! You can tell I prefer warm weather!

Despite owning/sewing a lot of dresses one of my favorite things to wear are graphic printed tees but in the winter It’s too cold to wear/showcase a printed tee so this is a good alternative. I just love the dorky yet cute vibe of embellished sweaters (provided they aren’t too ’80s Kath day knight’  Yikes!! No sequins or shoulder pads for me thanks!) Anyway the stitching is pretty ‘blah’ but you know what? you get the idea/vibe I was going for so I still like it!

Anyway here’s what I did….

feltpopdiy01

I just picked two colours of the polyester felt that I liked and tried to think of a design that would be cute, but was only made out of simple shapes…

feltpopdiy02

Then I drew some rough shapes. I ended up ‘refining’ it a bit with the scissors (making the pole narrower etc). It was rather stupid to use a dark blue marker to make these shapes, because it does show through slightly on the other side.

feltpopdiy03

The felt kind of sticks to the jumper temporarily so you can play with the positioning and decide what looks best, while you are wearing it. Next time I would have probably used an iron on adhesive called visoflex to adhere the felt to the jumper (before sewing around the design) but I did not want to make the trek to a fabric store just to get it so I just held it in place with pins while I sewed it.

feltpopdiy04

Then I googled “how to blanket stitch” and used polester sewing thread (doubled over) to stitch around the design. My hand sewing is terrible but ‘eh’ good enough…it’s just a bit of fun!

No news yet on how well this felt design holds up in the wash. But when I find out I will update this blog post with my findings!

Anyway…Yay! Summery fun in winter. Also speaking of icy poles or “pops” a lovely site called ‘Henry happened’ has some lovely looking DIY popsicle recipies. I guess for now I’ll stick to veggies and comfort food!

pl-05
pl-dressback
pl-02
pl-03
printloverdress-frontandback04
This was my final week of the sewing challenge I set for myself (making 1 item per week for a month). Technically it was last week, but I did finish the dress last week (I posted the finished dress on sunday on instagram)

So the reason behind me choosing ANOTHER summer shift dress was that I decided that life was too short not to use the best fabrics in my stash!

When I buy a fabric I really love I often fall into the trap of not doing anything with it! Have you experienced this. It can be a bit agonizing trying to decide how best to use a beloved fabric, because you want to make the most of it… but you know what?

I honestly think a dress you are not entirely happy with in a fabric you love is FAR better than a fabric you love gathering dust or tucked away in a stash for an eternity! The fabric was a lovely fabric I bought from Ikea (some years ago now) If anyone knows who designed the print please let me know!

I will say this, when I tried on the finished dress it became a case of “I’m not sure how to feel”…

While I was making it I was very excited about a simple dress that would showcase the print, but at the end of the whole process I put it on and just felt a bit blah. I was OK with it, but…

I hemmed both the dress and the lining before even attaching the lining to the dress. The problem with doing things this way is: now I feel as if it should have been shorter.

All the other dresses I made using the same pattern were too short, so I didn’t want to repeat that mistake with this one. Trouble is by keeping it longer it did seem to up the “frump factor” of the final dress and there are other things I should have changed, but really I can’t stay mad a dress made from such happy fabric!

Looking at the photos I don’t think it’s so bad. Do I look like a crazy lady who is wearing a loose table cloth? Perhaps. But perhaps I’m also a FABULOUS crazy lady as well. 😉

I just noticed (when editing the images) that I am leaning to one side in every single photo. haha- I’m not great at posing! 😛 Anyway. I can assure you the dress is straight when you stand straight!

wip
Sewing nitty gritty:

Cutting the dress out was a bit more time consuming than usual, as I tried to make an effort with the print placement 🙂

This is my third time using this pattern (heres version 1, version 2) and I think the honeymoon is over! somehow on this version it ended up looser than the previous version, but just like previous dress made from the same pattern, this also has the altered neckline and the low back neckline (which was lowered to eliminate the need for a zipper).

I used the same method of lining the dress as I did with previous versions. As always I used a thin cotton (probably voile) as lining because it’s SO. much. better. than. polyester lining. I’m telling you! 😉 🙂

Constructing this dress has become somewhat routine now and it feels stangely comforting to make it. But now that I am no longer hopeless with facings I don’t know if I have the patience for all this lining business (at least not on my next dress)!

I used a blind hem stitch/foot for all the hems because its quick yet fancy. Also I’m going to show you the insides because they are super pretty (yikes! Sewing is the only context where that sentence doesn’t sound creepy)!

hemandinsides

So that’s it friends the final ‘one project per week’ project! I am still going to be sewing every week, but now I’m free to make things that require more ‘fitting’. As much as I hate making toile/muslins they are essential to me when trying out a new pattern. I can’t promise that I’m finished with shift dresses or summer clothing, but I guess I will be stylish come December when it’s lovely and warm again!

Oh and thank you to the amazing ladies who participated in the 1ppw challenge! Thanks for sewing up a storm and sending me inspiration via instagram.

imisssummer01
imisssummer03
imisssummer04
imisssummer02
imisssummer-dress

Note: Sorry about the state of my hair. I think I want to grow it out into a short bob again heh Anyway…

Here’s this weeks ‘1 project per week’ project. I got hit with a pretty horrendous cold/flu thing, but I still wanted to keep my ‘1ppw’ promise! Today I felt a bit better but now I feel lousy again…it couldn’t have anything to do with taking photos of myself in a summer shift dress could it? I am such a nut job sometimes! OK most of the time, really….

Why do I sew summer dresses in winter? why do I only sew summer things? I never want to make winter clothing. I should up my game and make a coat! But I am a dreamer…summer dresses are what happiness is made of to me! The truth is I have more than enough things in my closet, so my sewing does not really have so much to do with being practical.

I was lucky enough to miss a big bit of winter this year when my boyfriend and I went to Malaysia on holidays. Sometimes I can’t believe the degree to which I complain about things or get down when the weather is cold. Winter sort of brings out my depressed alter ego or something. I need to work on changing my attitude to this season!

So what do I (actually)like about winter? You don’t get too hot when you are sewing, no mosquitoes, less sunburn, kiwi fruits are in season, coffee is even better on a cold day, more excuses to hug the people I love (who are always much warmer than I am) and of course coats kind of fun to wear! ummm that’s all I can think of! What do you like about winter?


Sewing nitty gritty:

I used some of the material I bought in Malaysia (I wanted to use some of this fabric- also why this is a summer project)! The pattern is Burda 7056 I have used this pattern before on this dress. The only change I made to this pattern was lowering the neckline.

I just love the simplicity of this design. It’s slightly a-line, but only slightly! It’s also loose like a shift should be, but it’s not at all baggy.

I really like how the cut of the neckline shows off the shoulders BUT the draw back is the dress is not bra-friendly, as in- your bra straps WILL show. and that’s no fun! ( I can’t go strapless or without one- I’m sorry too much information, I know!)

Materials and techniques (all the usual suspects). Blind machine hem (I machine hemmed the bottom of all the pieces BEFORE I sewed the side seams together). Center back invisible zipper. Used gutermann thread….

I actually enjoyed the facings. These ones stay down really well! I used quite a lightweight iron on interfacing for the facings. I’m so glad I bought a massive stock pile of this stuff (way back), because 1. it’s hard to get in the weight that I like especially now that I live in the city and 2. I do not want to stop my sewing project for something as boring buying interfacing!

For the all-in one facings on the dress I used the same technique I use when I line a sleeveless dress by machine. It’s pretty hard to explain so I’ll just show you some work in progress pictures….

imisssummer05

Above: Note this was BEFORE I graded and clipped the seams which is an absolute MUST!!!

imisssummer06

Above: Why hello my pretty clean-finished neckline and armholes 🙂 Now I just had to press it like mad and sew the side seams.

imisssummer07

Above: with one of the side seams done!

My one regret with this dress is the back is slightly funky, which could have been avoided if inserted the center back zipper BEFORE sewing the shoulder seams and BEFORE sewing the side seams. That’s what I plan to do next time.


So that was it! Now to fill my hotwater bottle and watch a swedish crime drama with the boyfriend. Yay!

x Kath

opskirt01 opskirt02 opskirt03 opskirt04

I have been feeling a bit down the last 2 days. My emotions have always been up and down at the best of times, so this little slump is nothing to worry about, but I want to make an effort to celebrate the good things.

I think, so far this year has been one of the happiest in my life! I started baking delicious bread, I’m living with my favorite person in the world, I discovered more like minded people who also love to sew and I have been on the most fantastic, memorable holiday! I may not have made much progress career-wise, but I have managed to do some work for people that they have been pretty happy with. I also feel so lucky to be living in one of my most favorite cities. I especially love living in the city area, close to where all the action is.

Sorry for getting personal on the blog… I think it’s so important for me to celebrate the good things! When I dwell on the bad things they seem to grow and fester. When I have gratitude, things seem to get better, or at least I seem to notice all the good things in my life!

So for my second ‘1 project per week’ project, I wanted to make something cheerful to wear during my least favorite time of year- winter. It’s so easy for me to give up on dressing well in winter. sometimes it seems all too easy to just throw on the warmest most boring thing….edit: I tried wearing this skirt with a jumper and tights today, but it was far too cold!


Sewing nitty gritty:

I discovered  a nifty way to pining the pleats before I stay stitch them (the way the horizontal pin is pinned into the fabric stops it moving around so much, when you sew)…

pining-pleats

I did one of my favorite things: I used the skirt portion of a dress pattern for this skirt. The pattern is Simplicity 1418 (project runway pattern). It was my first time trying this pattern and I gotta say: I’m in love! The pleats are just how I want them, and I will definitely be making the full dress version of this pattern!

I cut the skirt portion of the pattern out in a size 6. It’s pretty snug, but I want to wear this as a high-waisted skirt with cropped tops and such things in the summer (ah summer I miss you). I also shortened the skirt and skirtpattern by about 13cms or more!

I used about 1 meter 30 of fabric that was around 120-130cms wide.

I drafted the waistband myself and tried a new way of applying interfacing to it, that turned out well! By not applying interfacing to the seam allowance area it reduces bulk!

waistband

The waistband has no front and back, it is simply folded over! It has 2 side seams, one of which became the spot for the button closure (one of the side seams).

I made a super rookie mistake and applied the waistband before the zip… WHAT the hell?! Was a too excited about the pleats? I’m better than that by now, surely?! Anyway the overlap on the waistband turned out to be too big, but i’ll live with it. Looks ‘MEH’ but I’ll show you anyway…

closurenotgreat

Anyway the skirt was so quick and easy to whip up, but the single button hole proved a bit of a nightmare!

Bernie (my old bernina sewing machine) can no longer do automatic button holes. You used to be able to set the length of the buttonhole by pressing the back-stitch button, but this no longer works. Anyway the skirt was so quick and easy to whip up, but the single button hole was a pain.

I did my usual ‘machine blind hem stitch’ for the skirt hem, and invisible zipper. 🙂

Next time, when I make this skirt in another fabric (and there will most certainly be a next time) I will perhaps use velcro as the waistband fastening, rather than a button at the waistband. Lincraft did not have large hooks and eyes (like the sew one ones you get in trousers), which I originally planned to use.

Anyway here’s to my new happy skirt and the happy times to come!


I’m finally back in Australia. This trip really has been the trip of a lifetime. I ended up just posting holiday snaps to my instagram, because I accidentally deleted my travel tumblr (doh!)

Just to show I really mean to continue with this ‘1 project per week’ sewing challenge. I have already cut out (and overlocked) my next project. Here’s is a sneak peek…

1ppw-nobg

I think you can guess what I’m making (something I can wear in cold and warm weather). Not  that I EVER need ANY more clothes (please tell me it’s not time for a new hobby! or perhaps unselfish sewing?).

Shopping in Malaysia was insanely good! I tell you folks, this really was my idea of a dream holiday! Relaxing on resorts with cocktails and then the rest of the trip mostly consisted of lots of eating and shopping (two of my most favorite things!), But I’m sure what you really want to hear about is the fabric shopping…

I only found one good spot to buy fabric, but it really was one hell of a fabric shop. While I was in Penang we stayed with my boyfriends uncle and his family, his wife Grace remembered the fabric shop I loved so she took me back to it (isan’t she the best?!)! She said she had never seen anyone so excited about anything in her whole life. What can I say, I LOVE fabric…and when its around 5 Australian dollars per meter, just try and stop me from freaking out! haha

kamdar

The amazing fabric shop was called’ Kamdar’ in Penang. I did look for fabric stores in Kuala Lumpur, but I did not have much luck. China town (Kuala Lumpur) did have some fabric shops, but none of the ones I found were any good (all polyester fabrics and one shop filed with just gold 90’s style buttons I dislike).

Anyway here is what I scored from the shop ‘Kamdar’ in Penang:

myfabricfromkamdar

So many dreamy fabrics! I only had 25 minutes to choose these, I was running around like a mad woman, but I’m really happy with my choices. The first fabric is polyester, but the rest are cottons. I am so happy for every single one! Doesn’t the second pink floral remind you of a liberty fabric? its even a lawn!

I also bought some mock batik ones earlier at the airport that I kind of regret…

airportfabric

We were at the airport for hours and I hadn’t done any shopping yet. They are pretty thin and flimsy, but perhaps I will find a use for them.

I have fallen hard for Malaysian food (especially Nasi Lemak and Malaysian Indian/Thai dishes) and now that I am back in Australia I’m ready to work hard, so that perhaps I can go back again someday!